Protect Okta
AuthN by IDEE Integration: Okta Universal Directory
Further Securing Your Digital World
Okta Universal Directory is used by professional organizations that are serious about putting identities at the heart of their IT environments – we wholeheartedly approve! Okta’s highly acclaimed cloud-based directory is used by tens of thousands of organizations, to store user ID’s, attributes, and permissions and effectively manage workforces world-wide.
It all starts with people, and Okta Directory sits at the core of the organization - the data it stores and systems it connects to are as critical as they are valuable.
What if you could protect it all with next-level security in the form of MFA 2.0? We’re glad you’re here!
.avif)
All the Functionality of Okta Directory…
Just With a Whole Lot More!
then AuthN by IDEE is the right choice.
Here are some of the reasons why businesses know it makes sense to add AuthN by IDEE...

Cost Effective Multifactor Authentification
AuthN by IDEE is the most effective way to add the highest level of authentication security for the most optimum price per user - all the advantages of the highest tier of Okta MFA 2.0 with an abundance of extra benefits.

Highest Level of Authentication Security
Protects against all credential phishing & password-based attacks including AiTM.
AuthN by IDEE makes your solution even more secure with an extra layer that is not just phish-resistant, but demonstrably phish-proof.

No Disruption to Your Existing IT Environment
Okta is still your central repository, and the AuthN integration is the phish-proof forcefield that slots expertly into your existing IT infrastructure, protecting everything with no changes required.

Improved Productivity With Superior UX for Users
Users authenticate right on the device they are already using making sign-in and authentication seamless to the point that it is almost unnoticeable.

Compliance Just Became a Breeze
Many use cases demand higher levels of authentication security and AuthN guarantees a zero-trust solution that stores zero PII of any user.
AuthN Is Available via the Okta Integration Network
Integration is easy and AuthN by IDEE is an approved integration that can be found via the Okta Integration Network: https://www.okta.com/integrations/idee-mfa/
What Does Login Look Like?
Users’ authentication and login just got super slick. With AuthN by IDEE it’s like going back to before you had MFA… but now you have MFA 2.0! Here’s what it looks like for users.
How to Integrate Okta Universal Directory With Authn by Idee
Just like everything else about our product, integration is simple.
Your Step-by-step Integration Guide
- In the Admin Console, go to Security Identity Providers.
- Click Add identity provider, and then select SAML 2.0 IdP.
- Click Next.
- Configure the General Settings and Enter a Name for this IdP.
- Scroll down to Account matching with IdP Username, select idpuser.subjectNameId.
- Under Match Against section select Okta Username or Email.
- Change the Account Link Policy to Automatic.
- Select the option for If no match found as Redirect to Okta sign-in page.
- Provide the IDP issuer URI by copying the IDP Issuer URI from the IDEE Integrations page.
- Provide the IDP Single Sign-On URL by copying the IDP Single Sign-On URL from the IDEE Integrations page.
- Download the IDP Signature Certificate from IDEE Integrations page and upload it to the IDP Signature Certificate section.
- Change Request Binding to HTTP Redirect.
- Click on Finish to save.
- Download the SAML Metadata.
- Upload the metadata.xml file to the Service Provider Metadata section on the Integrations Page.
- Once uploaded, select your preferred Authentication method to complete your integration. We recommend using Web-AuthN 🔒
- You can test out your integration by using yourDomain.okta.com in your Browser.
- A new integration takes up to 5 minutes to be complete! ⏰
- This should redirect you to the IDEE Login Page.
Enrollment: Register
A New Device in Seconds!
AuthN by IDEE works on the basis of transitive trust, which means that only a trusted user can access a trusted service on a trusted device when proven to be in possession and control of their device. User devices, therefore, must be registered, but it is so straight forward, users can complete the process in just a few seconds, guided step-by-by-step from within the app. It’s child’s play!
.avif)
Your Step-by-Step Guide
- User goes to login to a protected domain for the first time and signs in
- They will be redirected to AuthN by IDEE to set up their device.
- The user simply unlocks their device, using facial recognition, PIN, or fingerprint.
- They will receive a secure magic link via email.
- The user clicks on the link which opens a new tab in the browser.
- User clicks ‘accept’ at which point they have registered their device. 🎉
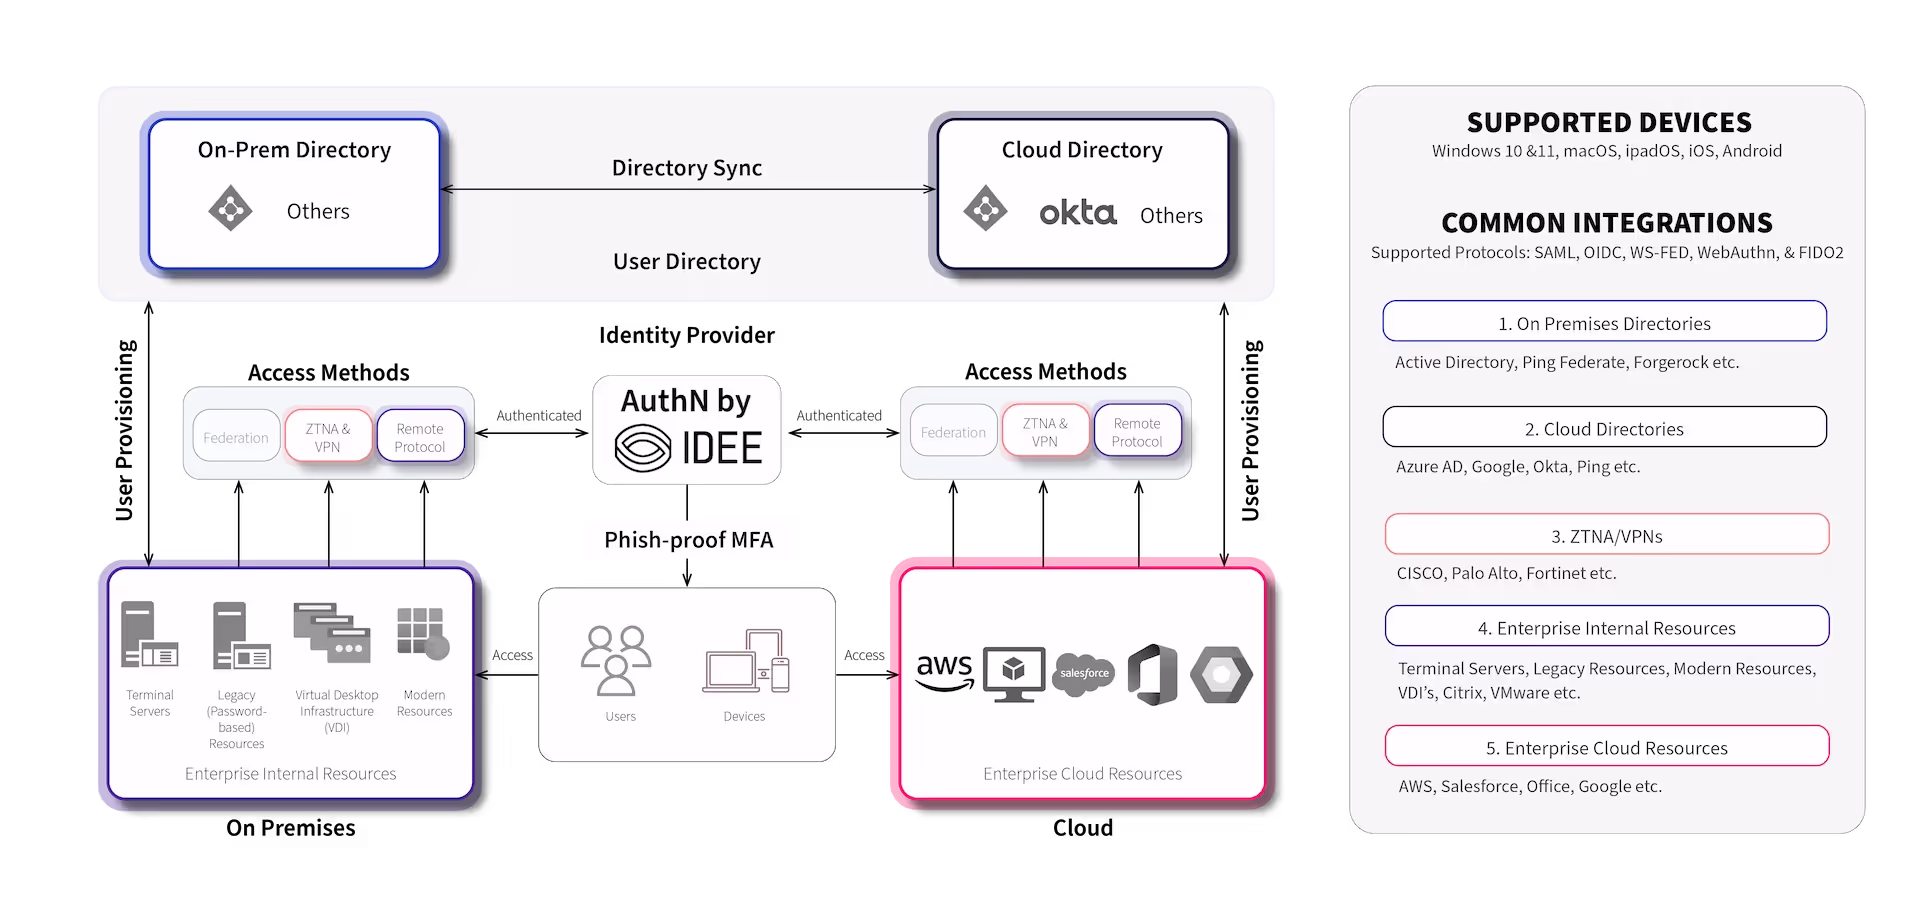
Protect Everything (Including Legacy Systems)
Once you have added AuthN by IDEE to your Okta account, you can protect everything with same-device phish-proof MFA.
AuthN by IDEE seamlessly integrates with Okta through modern authentication protocols. Thereafter, access to the Okta user dashboard is only possible via phish-proof MFA. The legacy applications that require passwords work just as before but with the additional security of phish-proof MFA and all the convenience of same device authentication.
In addressing the needs of legacy systems reliant on passwords, AuthN by IDEE also offers seamless integration with reverse proxy, Zero Trust Network Access (ZTNA), Secure Access Service Edge (SASE) and Virtual Private Network (VPN) solutions. By enforcing phish-proof Multi-Factor Authentication (MFA) prior to password entry, AuthN ensures robust security measures are in place. This approach guarantees that only authenticated users with the appropriate access rights to the designated application, are permitted to enter passwords and gain access. They must have also successfully completed the phish-proof MFA process first, thereby fortifying system security comprehensively.
Authentication Methods
Chose An Authentication Method That’s Right for You
We highly recommend you use Web-Authn which is the passwordless, same-device phish-proof, method of MFA. However, you do have choices and, it is up to you. Supported authentication methods include:
The following popular browsers are supported:
- WebAuthn
- FIDO2 Security Key
- PUSH
- QR
.avif)
Web-Authn offers the highest level of protection. We ensure that your digital identity is secure from phishing and password-based attacks throughout the entire lifecycle, which is why Web-Authn is our preferred and recommended option.
Device Requirements
Web-Authn works on any computer with a TPM chip (most machines from 2016 onwards have this) and/or any smartphone with a secure enclave or secure element.
The following popular browsers are supported:
- Microsoft Edge
- Chrome
- Safari
- Internet Explorer 7 or higher
.avif)
Fallback Procedures
We have not only eliminated phishing,
but we can also promise to eliminate the anxiety of account resets and recovery.
Our aim is to remove the complexity and stress from every area of authentication. Of course, a solution’s fallback procedure is always a consideration when weighing up whether an app is right for your use case, but there really is not much to talk about in this section because it is all so simple!
There’s Nothing to Lose!
First of all, there are no additional tokens, keys or USBs, let alone any secondary devices, and there are no passwords at any stage of the identity life cycle. This means that there is nothing to lose. Everything you need is already housed within the secure hardware of your registered device. This reduces the need for account recovery due to lost devices or hardware, and also eliminates the need to have back-up codes, or purchase replacement back-up hardware and we never fallback to passwords.
In the highly unlikely event that you do lose access to your trusted device (which will most likely be a work laptop or PC), you simply re-establish trust on your new one using secure identity proofing or setup the new device from an existing device using transitive trust.
.avif)
.avif)
Updates & Maintenance
Maximum Security – Zero Fuss
Because the AuthN solution is fully SaaS (Software as a Service), keeping everything up to date is a job that you simply don’t have to worry about. Let us take care of that – we can imagine you and your teams are busy enough!
Just be safe in the knowledge that with no additional hardware or software, there is absolutely zero firmware or software updates – you are fully protected with maximum-level security and with zero fuss.
How We Protect Your Data
Actually… what data? AuthN by IDEE holds zero personal identifiable information (PII) about its users, which is one of the reasons why it is so secure! That said, we take security and privacy incredibly seriously. Privacy is our primary company value, and this is why we also go to enormous lengths to ensure we meet all the important standards and compliance regulations you would expect from a chief cyber security vendor.
GDPR Compliant
IDEE is fully GDPR compliant, meaning that we take your data seriously. Always.
ISO 27001
We are 27001 certified.
SOC2 Type II
We are SOC2 certified.
Defense In-Depth
One layer is not enough. We employ layered security for every action.
Decentralized Credentials
Fully decentralized asymmetric keys stored inside the device security chip.
Strong Encryption
AES-256-Bit & ECC-512.
Did Somebody Say Compliance?
Rest assured, we are proud to say, that the AuthN by IDEE technology is backed by all the important standards. Due to new and incoming legislation, this is especially important if you are based in Europe or The United States.
United States - EO 14028 & OMB M-22-09
This executive order outlines the mandate for all federal government agencies and civilian agencies in the federal government, to use phish-resistant MFA. AuthN by IDEE goes one step further, in offering phish-proof protection compliant with EO 14028 & OMB M-22-09.
Europe - The Digital Operational Resilience Act (DORA) - Regulation (EU) 2022/2554 – DORA
DORA is new legislation aimed at increasing security in the financial sector in the EU and asserts that organizations will be obliged to “Implement strong authentication mechanisms, based on relevant standards.” AuthN by IDEE is fully compliant with DORA.
NIST (National Institute of Standards and Technology) Compliant
We are compliant with NIST’s digital identity guidelines (NIST SP 800-63).
FIDO2 Compliant
Expanding upon a FIDO2 compliant architecture, AuthN by IDEE is a strong zero-trust application of MFA. We do not trust blindly; all authentications are explicitly verified.
PSD2 Compliant SCA
Our MFA uses factors that supersede the PSD2 strong customer authentication requirement.
Based on proven Technology
We leverage PKC, TPM/Secure Enclave, and strong encryption.
Transitive Trust
Ensuring a transaction can only be carried out on a “trusted service” by a “trusted device” coupled to a “trusted user” and authorized under the “user’s total control.”
Phish-Proof
Phish-proof > phish-resistant:
AuthN by IDEE protects against every credential phishing and password-based attack, including Adversary in the Middle attacks (AiTM).
Support
It’s easy to find the support you need. Here are your resources:
Admin FAQ
Got questions? Well, the chances are that they may have been asked before, which is why we have a neat collection of the most frequently asked questions all in one place! Check it out!
Raise a ticket
Sometimes we just need a bit of technical support. Do you need to raise a ticket? No problem head over to the service desk and tell us how we can help. We will get back to you quickly!
Report an incident
Is there something we should know about or maybe you just have some excellent feedback for us? Please use this form to report a security incident, vulnerability, or an improvement.
Video tutorials
Already an admin? Visit the Knowledge Centre for step-by-step interactive video tutorials. Looking for demo videos? Check our YouTube playlists.
The IDEE Blog
We discuss many topics on our blog from authentication & cyber security, how our partners can build their business and featured guides and tools. Check it out!
You like what you see?
Speak to us today to try the best MFAsolution for yourself.